
Project Dashboard
The Project Dashboard is your central hub for managing all aspects of your testing project. It provides comprehensive information about your application under test, build details, team members, and project configuration.
| Section | Purpose |
|---|---|
| Build Management | Upload new builds, view build information, compare versions, track build history |
| Team Collaboration | Add team members, manage permissions, share resources |
| Project Settings | Configure integrations and manage access controls |
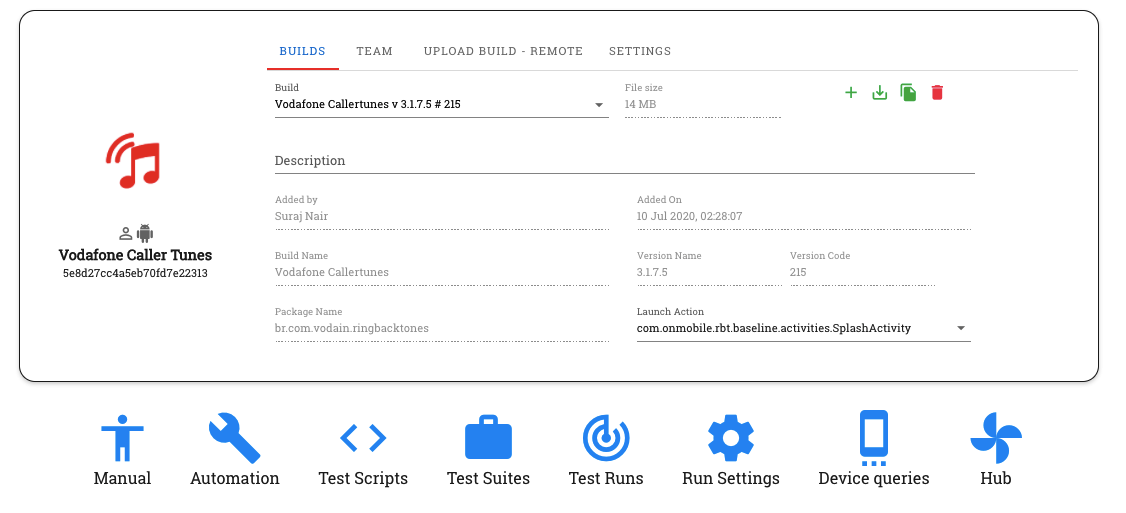
Dashboard Sections Overview
The Project Dashboard consists of 5 main sections designed to streamline your testing workflow:
Builds
Application Build Management
Manage application builds and versions with complete visibility into your app's evolution.
- Build Uploads: Upload new builds manually or via API
- Version Control: Track different versions and builds
- Build Information: View comprehensive build metadata
- Build Actions: Download, share, or delete builds
Team
Team Member Management
Handle project members and permissions to ensure proper collaboration and access control.
- Member Management: Add or remove team members
- Role Assignment: Assign admin or regular member roles
- Permission Control: Manage access to different features
Upload Build - Remote
Automated Build Integration
Automated build uploading via API for seamless CI/CD integration.
- API Commands: Ready-to-use CURL commands
- CI/CD Integration: Connect with your build pipeline
- Automation: Automatic build uploads from your CI system
- Build Metadata: Include build descriptions and labels
Settings
Project Configuration
Configure project preferences and integrations to customise your testing environment.
- Bug Tracker: Configure external bug tracking systems
- Integrations: Connect with third-party tools
Group
Device Group Membership
View the device groups this project belongs to. Groups are created and managed by your RobusTest administrator in the Admin Console.
Builds Section
This is the default landing section when you access a project, providing comprehensive build management capabilities.
| Feature | Description |
|---|---|
| Build Information Display | Build details (name, version, package), technical info (version code, launch activity), metadata (description, file size, upload details) |
| Key Benefits | Version control, team visibility, easy build selection, metadata management |
Build Information Display
The Builds section displays comprehensive information for each build in your project:
Build Details
Core Build Information
- Build Name: Descriptive name for easy identification
- Version Information: Version name and code
- Package Details: Application package name and structure
- Launch Activity: Primary activity that starts the app
Best Practice: Use descriptive build names that include version numbers and build types (e.g., "MyApp_v2.1.0_Release")
Build Metadata
Additional Build Information
- Build Description: Detailed description of build contents
- File Size: Build file size for storage planning
- Uploader Information: Team member who uploaded the build
- Upload Timestamp: Date and time of build upload
Build Status
Build State Information
- Processing Status: Build upload and processing state
- Availability: Whether build is ready for testing
- Selection State: Currently selected build for testing
Multiple Build Management
You can upload and manage multiple builds within a single project for comprehensive version testing:
| Aspect | Details |
|---|---|
| Build Organisation | Version comparison, regression testing, A/B testing, release management |
| Build Selection | Use build dropdown to select which build to test, quick access, team coordination |
Available Actions
The Builds section provides several management options to streamline your workflow:
Upload New Build
Manual Build Upload
Manually upload an application build from your local system.
- Supported Formats: APK, AAB, IPA, ZIP, XCTestPlan
- Build Validation: Automatic validation during upload
- Metadata Entry: Add descriptions and labels
Get Build URL
Build Download Access
Download or share the currently selected build directly from the dashboard.
- Direct Download: Share build files with team members
- Version Control: Access specific build versions
Copy Build ID
Build Identification
Copy the unique build identifier to your clipboard.
- API Integration: Use build IDs in API calls
- Automation: Reference builds in automated scripts
- CI/CD Integration: Connect with continuous integration
Delete Selected Build
Build Cleanup
Remove the selected build from the project.
- Storage Management: Free up storage space
- Project Cleanup: Remove outdated builds
Admin Privileges Required: Only project members with admin privileges can delete builds from the project.
Build Management Best Practices:
- Regular Cleanup: Periodically remove old builds to save storage
- Descriptive Names: Use clear, descriptive build names
- Version Control: Maintain a logical versioning scheme
- Team Communication: Notify team members about significant builds
Team Management
The Team section displays all project members and manages access permissions, enabling effective collaboration across your testing team.
| Capability | Description |
|---|---|
| Team Collaboration | Build access, automation, reports, collaboration |
| Access Control | Role-based access, granular permissions, security |
Team Member Capabilities
All project members have access to core testing functionality:
Testing Capabilities
Core Testing Functions
- Build Testing: Test any build within the project
- Device Access: Use project devices for testing
- Session Management: Create and manage test sessions
Collaboration: Team members can see each other's test sessions and results for better coordination
Automation Features
Automated Testing
- Script Creation: Create and run automation scripts
- Test Execution: Execute automated test suites
- Result Analysis: Analyse automation results
Reporting & Analytics
Test Reports
- Test Reports: View and generate comprehensive test reports
- Performance Analytics: Access performance metrics and insights
Member Roles and Permissions
Projects support two types of members with different privilege levels:
Admin Members
Enhanced Privileges
Admin members have comprehensive project management capabilities:
| Area | Administrative Powers |
|---|---|
| Project Management | Delete builds, add/remove team members, grant/revoke admin privileges, configure project settings |
| Technical Access | Execute CURL commands for remote build uploads, configure external tool integrations, access all project configuration options |
Regular Members
Standard Access
Regular members can perform standard testing activities:
| Capability | Status |
|---|---|
| What They Can Do | Test execution, build testing, report generation, collaboration |
| What They Cannot Do | Modify project structure, add/remove team members, delete builds, access admin-only features |
Admin Types Explained
Project Admin vs. RobusTest Admin
- Project Admin: Administrative access limited to their specific project
- RobusTest Admin: Platform-wide administrative access across all projects
Security Best Practices:
- Principle of Least Privilege: Grant minimum necessary permissions
- Regular Reviews: Periodically review team member access
- Admin Assignments: Carefully consider who gets admin privileges
Remote Build Upload (API)
Admin Only: This section is only visible to project admin members.
The Remote Build Upload section provides API capabilities for automating build uploads to your project, enabling seamless CI/CD integration.
| Aspect | Details |
|---|---|
| CI/CD Integration | Continuous integration, build automation, pipeline integration (Jenkins, GitLab CI, GitHub Actions) |
| Key Benefits | Time savings, consistency, reliability, scalability |
API Command Structure
curl -X PUT '<RobusTest URL>/v3/project/<PROJECT IDENTIFIER>/build?accesskey=<USER ACCESS KEY>' \
     -H 'content-Type: multipart/form-data' \
     -F 'build=@<BUILD NAME WITH PATH>' \
     -F 'buildInfo={"desc":"<build description>", "label":"<label>","activityClass":"<launch activity>"}'
Command Parameters Explained
RobusTest URL
The URL you use to access the RobusTest platform.
Format Examples:
- IP-based:
http://192.168.1.100:8085 - Domain-based:
http://robustest.company.com:8085 - Secure:
https://robustest.company.com
Project Identifier
The unique identifier for your project, extracted from the dashboard URL.
How to Find:
- Go to your Project Dashboard
- Look at the URL:
<RobusTest URL>/#/project/<Project ID>/dashboard - Copy the Project ID from the URL
Example:
- URL:
http://robustest.company.com:8085/#/project/5d176ffef0238be8f3b7afa5/dashboard - Project ID:
5d176ffef0238be8f3b7afa5
User Access Key
Each user has a unique access key for API authentication. Uploads are attributed to the owner of the key used.
See User Profile for details on obtaining your User Access Key.
Build Path
The path to your build file on the filesystem.
Examples:
- Absolute Path:
/home/user/builds/app-v1.2.3.apk - Relative Path:
./builds/latest.apk - CI Path:
$WORKSPACE/app/build/outputs/apk/release/app-release.apk
CI Integration: Use environment variables for dynamic paths
Build Metadata
Additional details about the build in JSON format.
Available Fields:
- desc: Build description
- label: Build label/version
- activityClass: Launch activity
- commitID: Source commit identifier — links the build to a specific git commit, making it easy to trace test results back to the exact code change in reports and dashboards
Example:
{
  "desc": "Release build v1.2.3 - Bug fixes",
  "label": "v1.2.3",
  "activityClass": "com.example.MainActivity",
  "commitID": "a1b2c3d4"
}
Sample Implementation
curl -X PUT 'http://robustest.company.com:8085/v3/project/5d176ffef0238be8f3b7afa5/build?accesskey=aY33cDmkt7B2nAjxBl6Tp2FWv4' \
     -H 'content-Type: multipart/form-data' \
     -F 'build=@/builds/myapp-v1.2.3.apk' \
     -F 'buildInfo={"desc":"Release build v1.2.3 with bug fixes", "label":"v1.2.3"}'
CI/CD Integration Examples
Jenkins Integration
pipeline {
    agent any
    stages {
        stage('Build') {
            steps {
                sh './gradlew assembleRelease'
            }
        }
        stage('Upload to RobusTest') {
            steps {
                script {
                    def buildPath = "app/build/outputs/apk/release/app-release.apk"
                    def buildInfo = """{"desc":"Jenkins build ${BUILD_NUMBER}", "label":"${BUILD_TAG}", "commitID":"${GIT_COMMIT}"}"""

                    sh """
                        curl -X PUT '${ROBUSTEST_URL}/v3/project/${PROJECT_ID}/build?accesskey=${ACCESS_KEY}' \
                             -H 'content-Type: multipart/form-data' \
                             -F 'build=@${buildPath}' \
                             -F 'buildInfo=${buildInfo}'
                    """
                }
            }
        }
    }
}
GitHub Actions
name: Build and Upload to RobusTest

on:
  push:
    branches: [ main ]

jobs:
  build-and-upload:
    runs-on: ubuntu-latest
    steps:
      - uses: actions/checkout@v2

      - name: Build APK
        run: ./gradlew assembleRelease

      - name: Upload to RobusTest
        run: |
          curl -X PUT '${{ secrets.ROBUSTEST_URL }}/v3/project/${{ secrets.PROJECT_ID }}/build?accesskey=${{ secrets.ACCESS_KEY }}' \
               -H 'content-Type: multipart/form-data' \
               -F 'build=@app/build/outputs/apk/release/app-release.apk' \
               -F 'buildInfo={"desc":"GitHub Actions build ${{ github.run_number }}", "label":"${{ github.ref_name }}", "commitID":"${{ github.sha }}"}'
GitLab CI
stages:
  - build
  - upload

build:
  stage: build
  script:
    - ./gradlew assembleRelease
  artifacts:
    paths:
      - app/build/outputs/apk/release/app-release.apk

upload_to_robustest:
  stage: upload
  script:
    - |
      curl -X PUT "${ROBUSTEST_URL}/v3/project/${PROJECT_ID}/build?accesskey=${ACCESS_KEY}" \
           -H 'content-Type: multipart/form-data' \
           -F 'build=@app/build/outputs/apk/release/app-release.apk' \
           -F "buildInfo={\"desc\":\"GitLab CI build ${CI_PIPELINE_ID}\", \"label\":\"${CI_COMMIT_REF_NAME}\", \"commitID\":\"${CI_COMMIT_SHA}\"}"
Best Practices
Security Best Practices
- Environment Variables: Store access keys in environment variables
- Secret Management: Use CI/CD secret management systems
- Key Rotation: Regularly rotate access keys
- Access Control: Limit who has access to API keys
Never commit access keys to version control
Automation Best Practices
- Build Validation: Verify build success before upload
- Error Handling: Implement proper error handling
- Metadata: Include meaningful build descriptions
Settings
The Settings section allows you to configure project-level integrations:
Enable Notifications — When enabled, each member of the team is notified by email whenever a new build is uploaded to the project.
Bug Tracker Configuration — Select your bug tracking tool integration. Once a configuration is selected, bugs encountered during testing can be logged directly from RobusTest into the tool of your choice. Bug tracker integrations are set up by your administrator in the Admin Console.
See Also: For details on configuring notifications, integrations, and how these settings apply during test execution, refer to Run Settings.
Related Documentation
See Also:
- Manual Session — Start a manual test session
- Automation Reports — View and analyse automation test results
- Live View — Monitor active test sessions in real-time
- Run Settings — Configure test execution parameters